CREATE STORYLINE
Storyline Creation Guide: Step-by-Step Tutorial for New Users
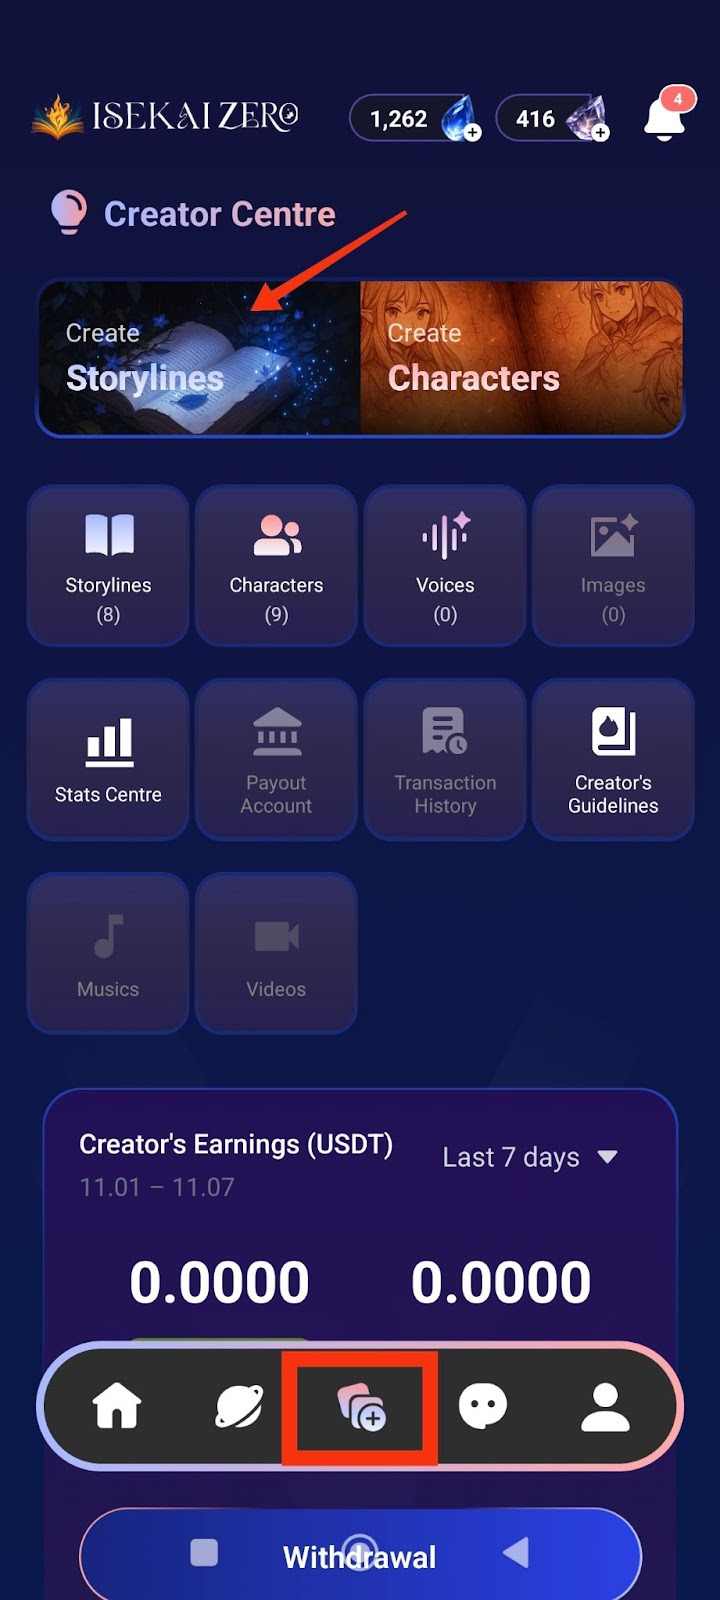
Step 1: Access the Creator Centre
Open the Isekai Zero app.
Tap on the Creator Centre section.
You'll see two main options at the top.
“Create Storylines” is on the left.
Tap on "Create Storylines".
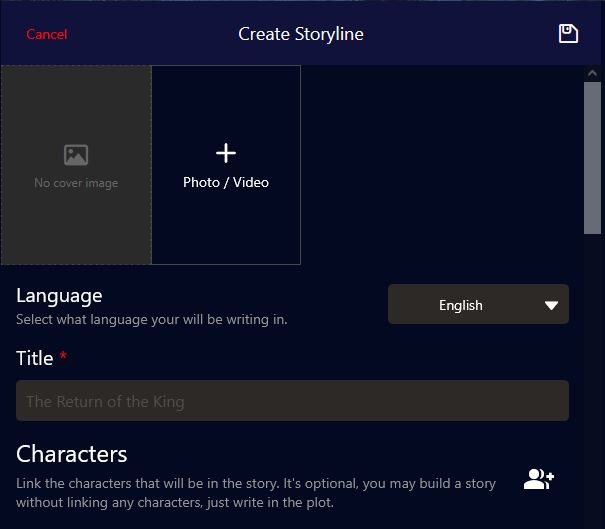
Step 2: Add a Cover Image
*Compulsory for Public Storyline
**Optional for Private Storyline
The Create Storyline screen will open. At the top, you'll see:
A placeholder to add image
To add a cover image:
Tap the "+ Photo / Video" button
Select an image from your gallery
The first image will be the thumbnail for your storyline
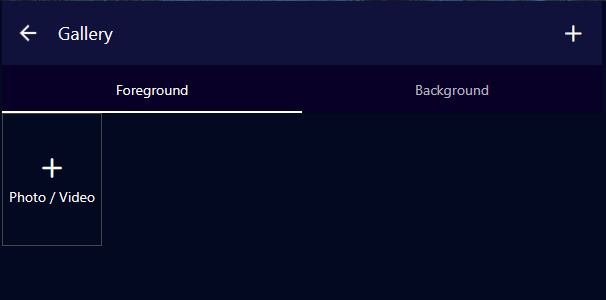
Adding Story Images (Foreground & Background)
These images create the visual experience as your story plays, especially in Visual Novel mode.
Understanding Image Types:
Foreground Image:
The character or subject image that appears in front
Usually a PNG image with transparent background
Shows the character/subject of interest during the ongoing story
Examples: Character portraits, NPCs, creatures, important objects
Tip: Use PNG files with transparent backgrounds for best results
Background Image:
The location/environment image behind the character
Shows where the scene is taking place
Examples: rooms, dungeons, parks, hallways, forests, castles, city streets
Sets the mood and atmosphere of the scene
Image Caption:
Text descriptions that help the right image appear at the right moment
Allows images to change dynamically based on what's happening in the story
Example captions: "in the throne room", "during battle", "at sunrise", "talking to the merchant"
The AI uses these captions to match images to story events
Character Image Captions:
Character image captions allow the right emotions to appear during the story. Use emotional descriptions to trigger appropriate character expressions.
Examples:
"Jane is happy"
"John is excited"
"Lola is sad"
This helps the AI system display the matching character emotion/expression based on what's happening in the story narrative.
How to Add Images:
Tap "Add Foreground Image" to upload character/subject images
Tap "Add Background Image" to upload location/environment images
For each image, optionally add an Image Caption to describe when it should appear
You can add multiple images for different scenes
Image Tips:
For Foreground:
Use PNG format with transparent backgrounds
Focus on clear character expressions and poses
Consider different poses for different emotions (happy, sad, angry, etc.)
For Background:
Use high-quality landscape/environment images
Match the atmosphere of your story (dark for horror, bright for adventure)
Consider having backgrounds for different locations in your story
For Captions:
Be specific but concise: "in the castle courtyard" not just "outside"
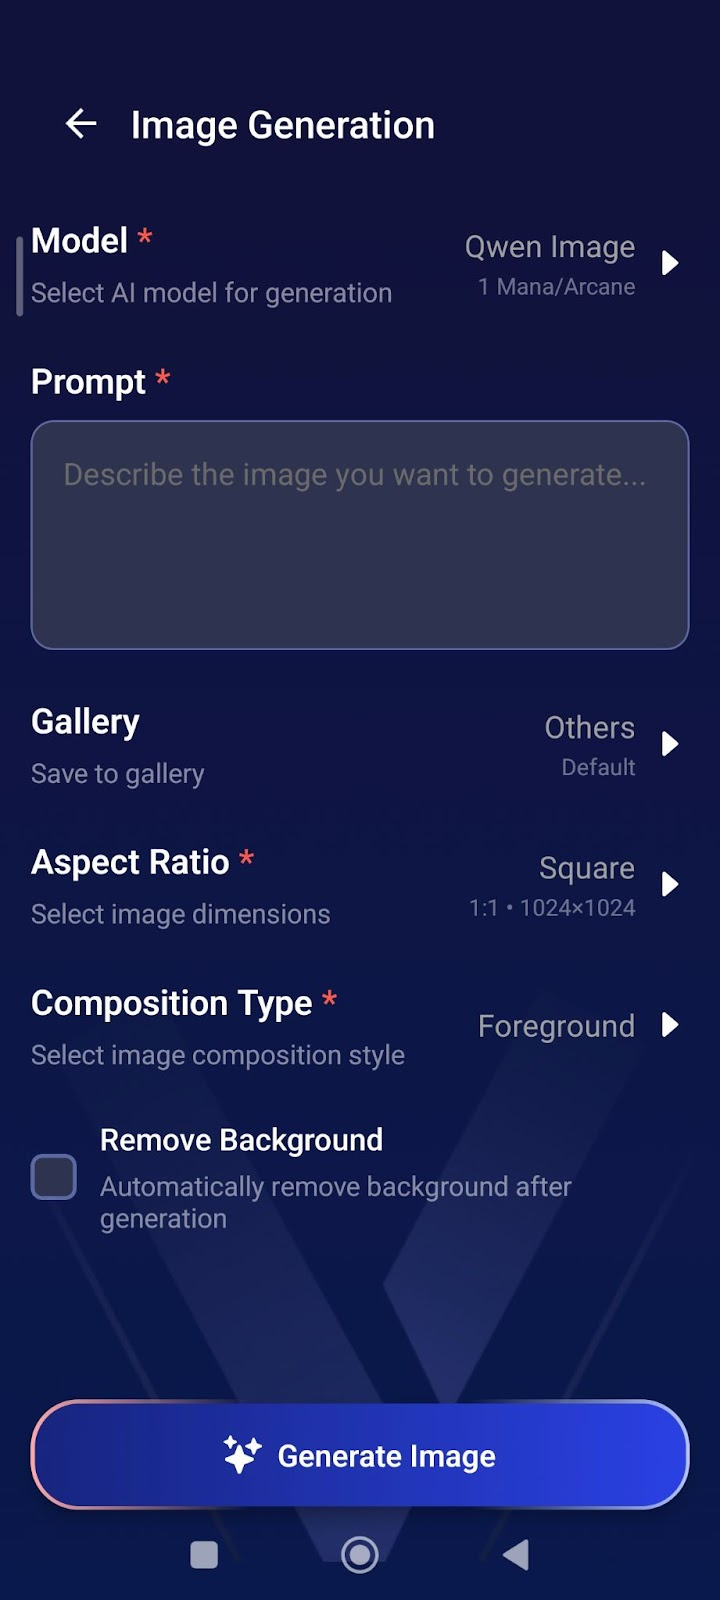
AI Image Generation
How to Generate Images:
From Creator Centre, tap "Images"
Tap "Model" → Select AI model (costs 1 Mana/Arcane)
Write your "Prompt" → Describe the image you want
Select "Aspect Ratio" → Choose Square (1:1) for portraits
Choose "Composition Type":
Foreground = Character images
Background = Location images
Check "Remove Background" (optional) → Creates transparent PNG for characters
Tap Generate Image
Prompt Tips:
For Characters:
"Elf warrior, blonde hair, green eyes, leather armor, smiling, anime style"
Enable "Remove Background" for clean character images.
For Backgrounds:
"Dark medieval castle interior, torch lighting, stone walls"
Keep background unchecked.

Step 3: Select Language
Find the "Language" dropdown
Tap to select the language you'll be writing in
Step 4: Enter Your Story Title ⚠️(Required)
Find the "Title" field (marked with a red asterisk *)
Type your storyline title.
Step 5: Link Characters (Optional)
Scroll down to the "Characters" section
You'll see a icon on the right
Tap it to link character(s)
Note: This is optional - you can create a story without linking characters
Step 6: Write Your Plot Summary ⚠️ (Required)
Read the instructions.
Write a short, catchy summary (20 words or less)
Example: "A dark lord rises, and unlikely heroes embark on a quest to destroy a powerful artifact."
Step 7: Write the Full Plot (AI Instructions) ⚠️ (Required)
Read the instructions.
Write your complete story plot with details
Important tips:
Write {{user}} wherever you want the player's name to appear
Be detailed - the AI uses this to generate responses
You can use Markdown formatting (bold, italics, etc.)
You can use HTML if needed
Example:
As darkness threatens the land, {{user}} and their loyal companion, Elen, set out on a perilous quest to destroy a powerful artifact...
Step 8: Write Plot (User Version) ⚠️ (Required)
Scroll down to "Plot (User)"
This is what users will actually read
Write the same or a modified version of your plot
Tip: This can be more narrative and engaging since players will see it
Step 9: Configure Advanced Mode (Optional)
Find the "Advanced Mode" toggle switch
When ON (green): The plot displayed to users can be different from what the AI reads
When OFF (gray): The same plot is used for both AI and users
Leave it ON if you want different versions
Step 10: Configure Secret Mode (Optional)
Find the "Secret Mode" toggle switch
When ON: Hides the AI prompt from users
When OFF: Users can see the prompts
Choose based on your preference
Step 11: Write Prompt Plot (AI) ⚠️ (Required if using Advanced Mode)
Find "Prompt Plot (AI)"
This is specifically what the AI will read to generate responses
Write detailed instructions for how the AI should handle the story
Use {{user}} for the player's name
Step 12: Add Prompt Guidelines (Optional)
Add instructions for the AI's behavior
Example: "Focus on the relation dynamics" or "Avoid using repeated vocabulary"
Step 13: Create First Messages (Scenarios) ⚠️ (Required)
Write the opening message for your story
Tap the "+" button to add more starting scenarios if you want to
This is how the story begins for players
Make it engaging and set the scene
Use {{user}} for player names
Example:
"You're finally awake," Elen says, her voice a mix of relief and gentle teasing. She sits beside the fading campfire...
Step 14: Add Storyline Tags (Optional)
Tap the pencil icon on the right
Add relevant tags to help users find your story
Examples: fantasy, adventure, romance, action
Step 15: Set Player Personas (Optional)
Tap the icon on the right
Link characters that players can choose to play as
Note:
Use this feature if you have a recommended character for your story - especially helpful for character-focused storylines where you want users to experience the story through a specific character's perspective
Setting player personas guides users toward the intended gameplay experience
This is optional - users can choose other characters if you don't set this
Step 16: Choose Visibility Settings
Scroll down to "Visibility" section
Tap the dropdown (shows "Private" by default)
Select from three options:
Private: Only you can see it
Unlisted: Anyone with the link can access it
Public: Everyone can find and play it
Step 17: Save Your Storyline
Scroll to the bottom of the page to tap the large "Save Storyline" button OR
tap the on the top right of the page.
Your storyline is now saved!
Tips
Use {{user}} placeholder - This automatically inserts the player's name
Be detailed in AI Plot - The more detail, the better AI responses
Make engaging first messages - Hook players from the start
Test your story - Create it as Private first to test before making it Public
Add multiple scenarios - Give players different starting points