STORYLINE CREATION GUIDE
Storyline Creation Guide: Step-by-Step Tutorial for New Users
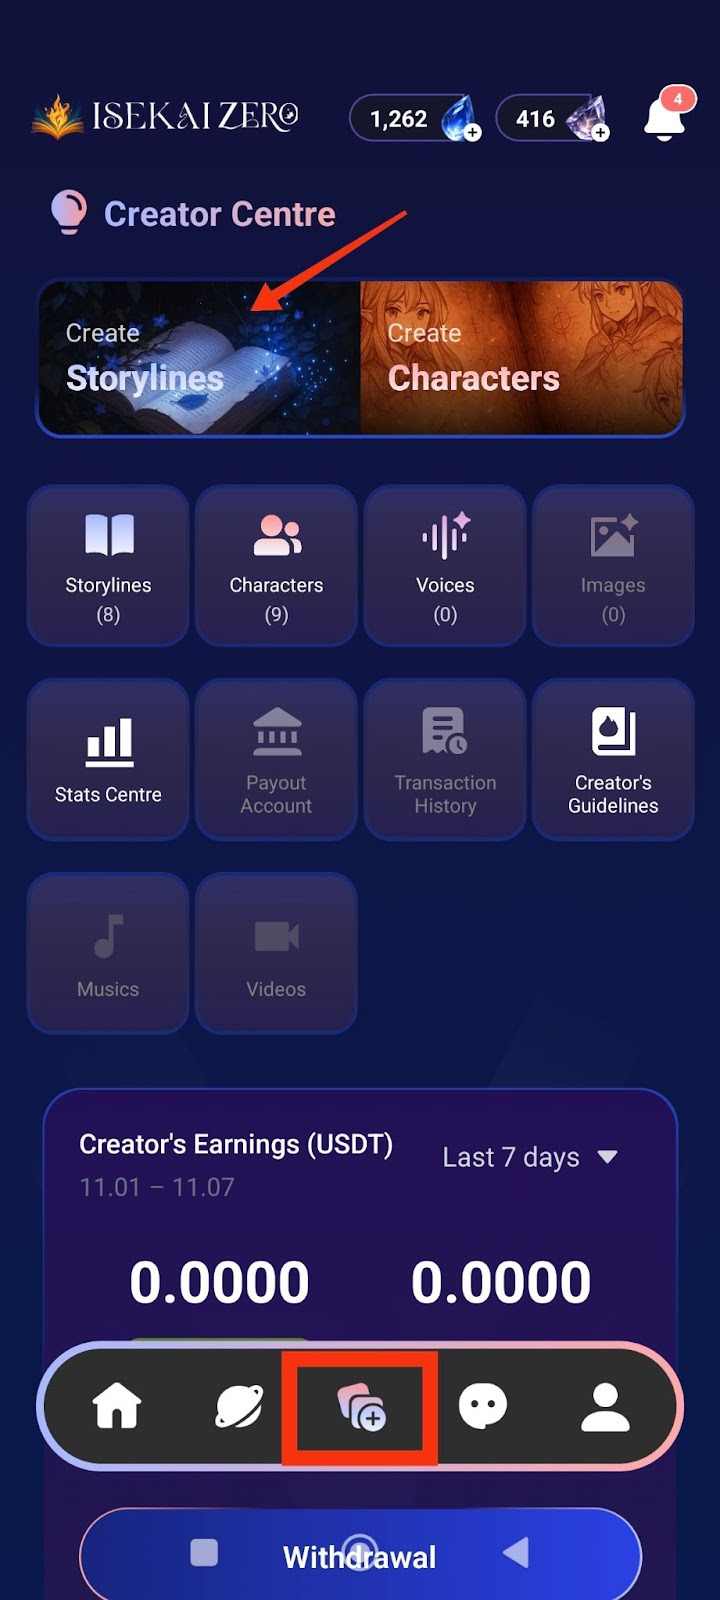
Step 1: Access the Creator Centre
- Open the Isekai Zero app.
- Tap on the Creator Centre section.
- You will see two main options at the top.
- “Create Storylines” is on the left.
- Tap on "Create Storylines".
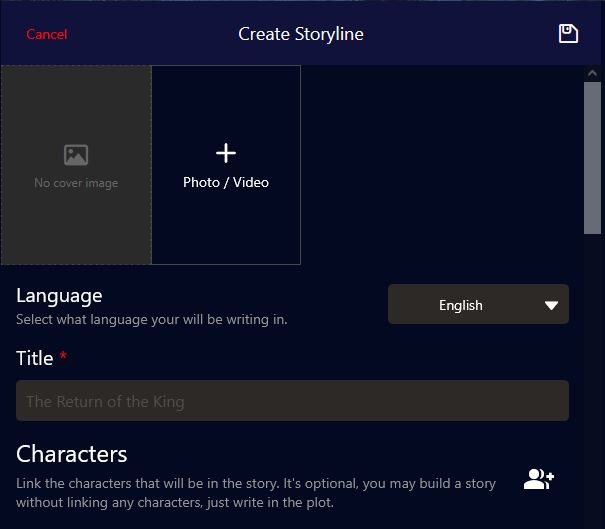
Step 2: Add a Cover Image
*Compulsory for Public Storyline
**Optional for Private Storyline
The Create Storyline screen will open. At the top, you'll see:
- A placeholder to add image
- To add a cover image:
- Tap the "+ Photo / Video" button
- Select an image from your gallery
- The first image will be the thumbnail for your storyline
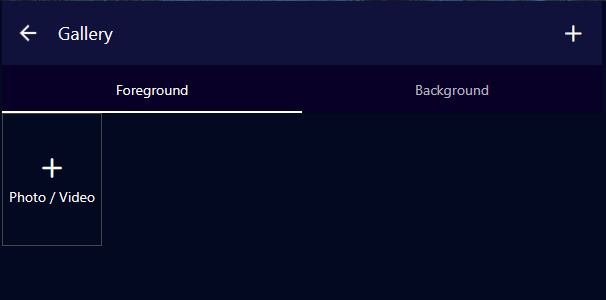
Adding Story Images (Foreground & Background)
These images create the visual experience as your story plays, especially in Visual Novel mode.
Understanding Image Types:
Foreground Image:
- The character or subject image that appears in front
- Usually a PNG image with transparent background
- Shows the character/subject of interest during the ongoing story
- Examples: Character portraits, NPCs, creatures, important objects
Tip: Use PNG files with transparent backgrounds for best results
Background Image:
- The location/environment image behind the character
- Shows where the scene is taking place
- Examples: rooms, dungeons, parks, hallways, forests, castles, city streets
- Sets the mood and atmosphere of the scene
Image Caption:
- Text descriptions that help the right image appear at the right moment
- Allows images to change dynamically based on what's happening in the story
- Example captions: "in the throne room", "during battle", "at sunrise", "talking to the merchant"
- The AI uses these captions to match images to story events
Character Image Captions:
Character image captions allow the right emotions to appear during the story. Use emotional descriptions to trigger appropriate character expressions.
Examples:
- "Jane is happy, wearing pajamas"
- "John is excited"
- "Lola is sad"
This helps the AI system display the matching character emotion/expression based on what's happening in the story narrative.
How to Add Images:
- Tap "Add Foreground Image" to upload character/subject images
- Tap "Add Background Image" to upload location/environment images
- For each image, optionally add an Image Caption to describe when it should appear
- You can add multiple images for different scenes
Image Tips:
For Foreground:
- Use PNG format with transparent backgrounds
- Focus on clear character expressions and poses
- Consider different poses for different emotions (happy, sad, angry, etc.)
For Background:
- Use high-quality landscape/environment images
- Match the atmosphere of your story (dark for horror, bright for adventure)
- Consider having backgrounds for different locations in your story
For Captions: Be specific but concise - "in the castle courtyard" not just "outside"
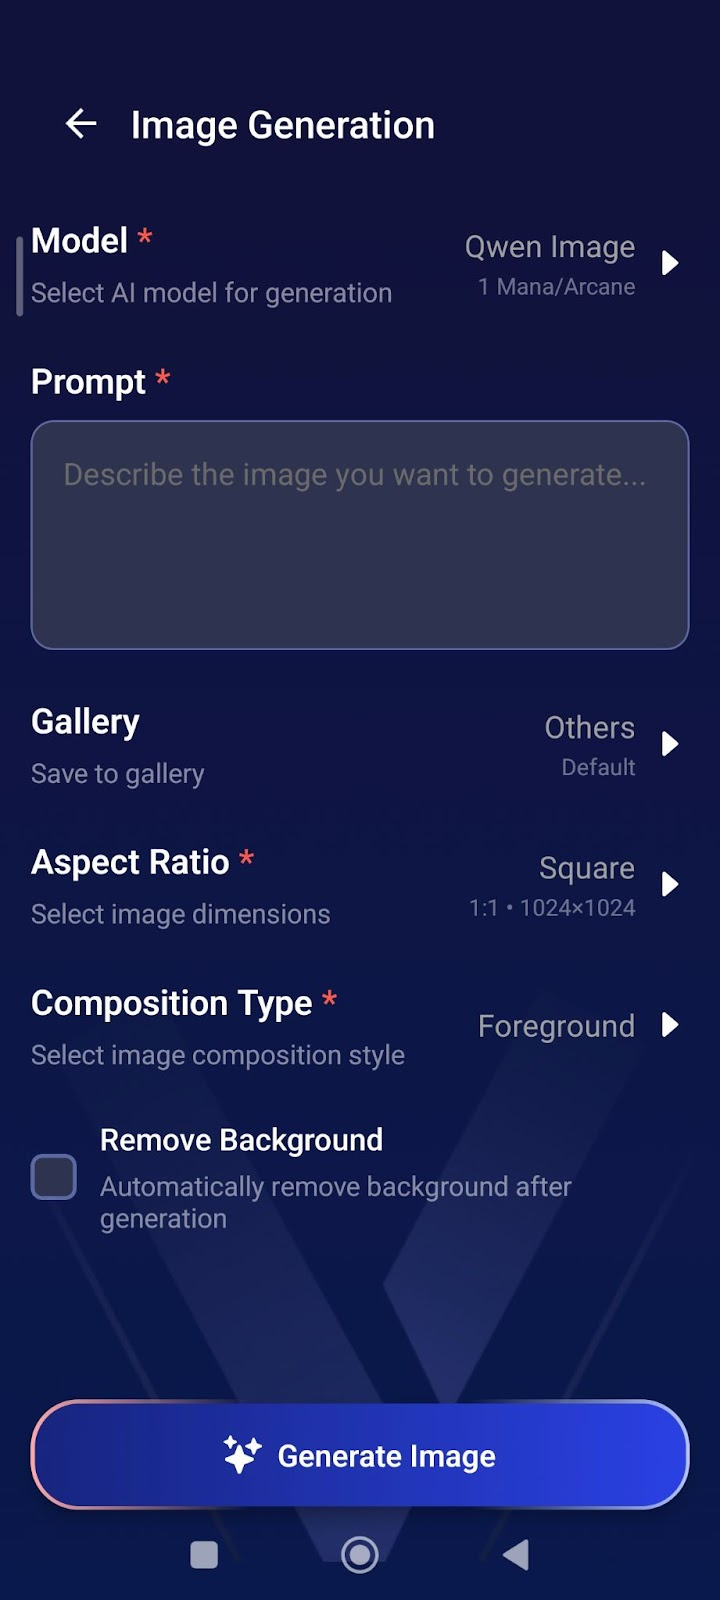
AI Image Generation
How to Generate Images:
- From Creator Centre, tap "Images"
- Tap "Model" → Select AI model (costs 1 Mana/Arcane)
- Write your "Prompt" → Describe the image you want
- Select "Aspect Ratio" → Choose Square (1:1) for portraits
- Choose "Composition Type" Foreground = Character images, Background = Location images
- Check "Remove Background" (optional) → Creates transparent PNG for characters
- Tap Generate Image
Prompt Tips:
For Characters:
- "Elf warrior, blonde hair, green eyes, leather armor, smiling, anime style"
- Enable "Remove Background" for clean character images.
- For Backgrounds:
- "Dark medieval castle interior, torch lighting, stone walls"
- Keep background unchecked.

Step 3: Select Language
- Find the "Language" dropdown
- Tap to select the language you'll be writing in
Step 4: Enter Your Story Title ⚠️(Required)
- Find the "Title" field (marked with a red asterisk *)
- Type your storyline title.
Step 5: Link Characters (Optional)
- Scroll down to the "Characters" section
- You'll see a icon on the right
- Tap it to link character(s)
- Note: This is optional - you can create a story without linking characters
Step 6: Write Your Plot Summary ⚠️ (Required)
- Read the instructions.
- Write a short, catchy summary (20 words or less)
- Example: "A dark lord rises, and unlikely heroes embark on a quest to destroy a powerful artifact."
Step 7: Write the Full Plot (AI Instructions) ⚠️ (Required)
- Read the instructions.
- Write your complete story plot with details
- Important tips:
- Write {{user}} wherever you want the player's name to appear
- Be detailed - the AI uses this to generate responses
- You can use Markdown formatting (bold, italics, etc.)
- You can use HTML if you want
Example:
As darkness threatens the land, {{user}} and their loyal companion, Elen, set out on a perilous quest to destroy a powerful artifact...
Step 8: Write Plot (User Version) ⚠️ (Required)
- Scroll down to "Plot (User)"
- This is what users will actually read
- Write the same or a modified version of your plot
- Tip: This can be more narrative and engaging since players will see it
Step 9: Configure Advanced Mode (Optional)
- Find the "Advanced Mode" toggle switch
- When ON (green): The plot displayed to users can be different from what the AI reads
- When OFF (gray): The same plot is used for both AI and users
- Leave it ON if you want different versions
Step 10: Configure Secret Mode (Optional)
- Find the "Secret Mode" toggle switch
- When ON: Hides the AI prompt from users
- When OFF: Users can see the prompts
- Choose based on your preference
Step 11: Write Prompt Plot (AI) ⚠️ (Required if using Advanced Mode)
- Find "Prompt Plot (AI)"
- This is specifically what the AI will read to generate responses
- Write detailed instructions for how the AI should handle the story
- Use {{user}} for the player's name
Step 12: Add Prompt Guidelines (Optional)
- Add instructions for the AI's behavior
- Example: "Focus on the relation dynamics" or "Avoid using repeated vocabulary"
Step 13: Add AI Reminder (Optional)
- Find the "AI Reminder" section
- This reminder will be placed after every user message to help the AI remember important details during the story
- Use this for critical instructions you want the AI to consistently follow throughout the chat
- Example reminders:
- "Follow the prompt guideline strictly"
- "Trigger stat system every new day and when user says 'check status'"
- "Keep storyline direction focused on the main quest"
- "Remember character relationships and past events"
*Important Note: Too much reminder text may make AI responses rigid
Works best for very specific, essential instructions rather than general guidance
Step 14: Create First Messages (Scenarios) ⚠️ (Required)
- Write the opening message for your story
- Tap the "+" button to write your opening message
- This is how the story begins for players
- Make it engaging and set the scene
- Use {{user}} for player names
- You can write more than one opening message, the "+" button add more starting scenarios if you want to
Example:
"You're finally awake," Elen says, her voice a mix of relief and gentle teasing. She sits beside the fading campfire...
Step 15: Add Storyline Tags (Optional)
- Tap the
 icon on the right
 - Add relevant tags to help users find your story
- Examples: fantasy, adventure, romance, action
Step 16: Set Player Personas (Optional)
- Tap the icon on the right
- Link characters that players can choose to play as
- Note:
- Use this feature if you have a recommended character for your story - especially helpful for character-focused storylines where you want users to experience the story through a specific character's perspective
- Setting player personas guides users toward the intended gameplay experience
- This is optional - users can choose other characters if you don't set this
Step 17: Choose Visibility Settings
- Scroll down to "Visibility" section
- Tap the dropdown (shows "Private" by default)
- Select from three options:
- Private: Only you can see it
- Unlisted: Anyone with the link can access it
- Public: Everyone can find and play it
Important Note for Public Storylines:
If you select Public visibility, your storyline will be submitted for review before it becomes publicly available.
- Review time: 2-3 business days
- During review: Your storyline will remain private/hidden
- After approval: It will appear in public listings for all users to discover
- You will be notified once the review is complete
- Your storyline will be automatically translated into 10 languages, making it accessible to players worldwide.
💡 Tip: If you want to play immediately, choose Private or Unlisted first. You can always change to Public later.
Step 18: Save Your Storyline
- Scroll to the bottom of the page to tap the large "Save Storyline" button OR tap the on the top right of the page.
- Your storyline is now saved!
Note: You can update your published storylines and characters at any time, but all changes require re-approval (1-3 working days) before going live.
Tips
- Use {{user}} placeholder - This automatically inserts the player's name
- Be detailed in AI Plot - The more detail, the better AI responses
- Make engaging first messages - Hook players from the start
- Test your story - Create it as Private first to test before making it Public
- Add multiple scenarios - Give players different starting points
Public Content Quality Standards
Review Process
All storylines and characters submitted for Public visibility are reviewed to ensure they meet our content guidelines and quality standards.
Important Notice
- Following our Content Creation Policy doesn't automatically guarantee approval.
- Even if your storyline and characters complies with all content guidelines, it may still be rejected if it shows insufficient effort or lacks basic detail.
What We're Looking For
Quality and polished content is always appreciated, but we recognize that experience levels vary and we know everyone starts somewhere. What we are really looking for is genuine thought and effort behind your content.
Your storyline and character should have:
✅ Reasonable detail - Enough information for players to understand the setting and characters
✅ Clear premise - Players should know what to expect from your storyline/character
✅ Basic completeness - Character traits, storyline setup, and relevant context included
✅ Genuine effort - Shows you've spent time developing your idea
We understand:
- Not everyone is a professional writer
- You're still learning and improving
- Creative styles vary
❌ WHAT GETS REJECTED
Content that shows minimal to no effort, such as:
- Extremely vague descriptions (1-2 sentences with no detail)
- Empty or placeholder text
- No character background or personality
- Unclear or missing storyline premise
- Obviously rushed or incomplete submissions
✅ WHAT GETS APPROVED
Content that shows genuine effort, even if not perfect:
- Detailed enough for players to understand the story
- Clear character personalities and backgrounds
- Understandable storyline setup and goals
- Proper categorization and tags
- Shows you've thought about your creation
Remember: We are looking for effort and care!
Quick Examples
❌ Too Minimal (Likely rejected):
Character: Warrior
Description: Fights
Storyline: Battle
This shows no effort or detail.
✅ Sufficient Effort (Likely approved):
Character: Captain Reylan
Description: An experienced mercenary captain who's tough but fair.
She leads a small group of fighters and takes on dangerous jobs.
She's loyal to her crew but haunted by a past mission gone wrong.
Storyline: Captain Reylan is hired to escort medicine through
dangerous territory during a plague outbreak. Things get complicated
when she suspects the plague might not be natural.
Not perfect, but shows clear effort and gives players enough to work with.
If Your Content is Rejected
Don't worry! Rejection doesn't mean your idea is bad.
You'll receive:
- Reason for rejection
- Guidance on what needs improvement
You can:
- Add more details and resubmit
- Expand character backgrounds
- Keep it Private/Unlisted instead
Note: Storylines and characters with images unrelated to the content will be rejected. Ensure your images match your storyline theme and character descriptions.
Most rejections are easily fixable with a bit more detail!
Bottom Line
Put some thought into your creation, give players enough detail to enjoy the story, and you'll be fine.