CREATE STORYLINE
Storyline Creation Guide: Step-by-Step Tutorial for New Users
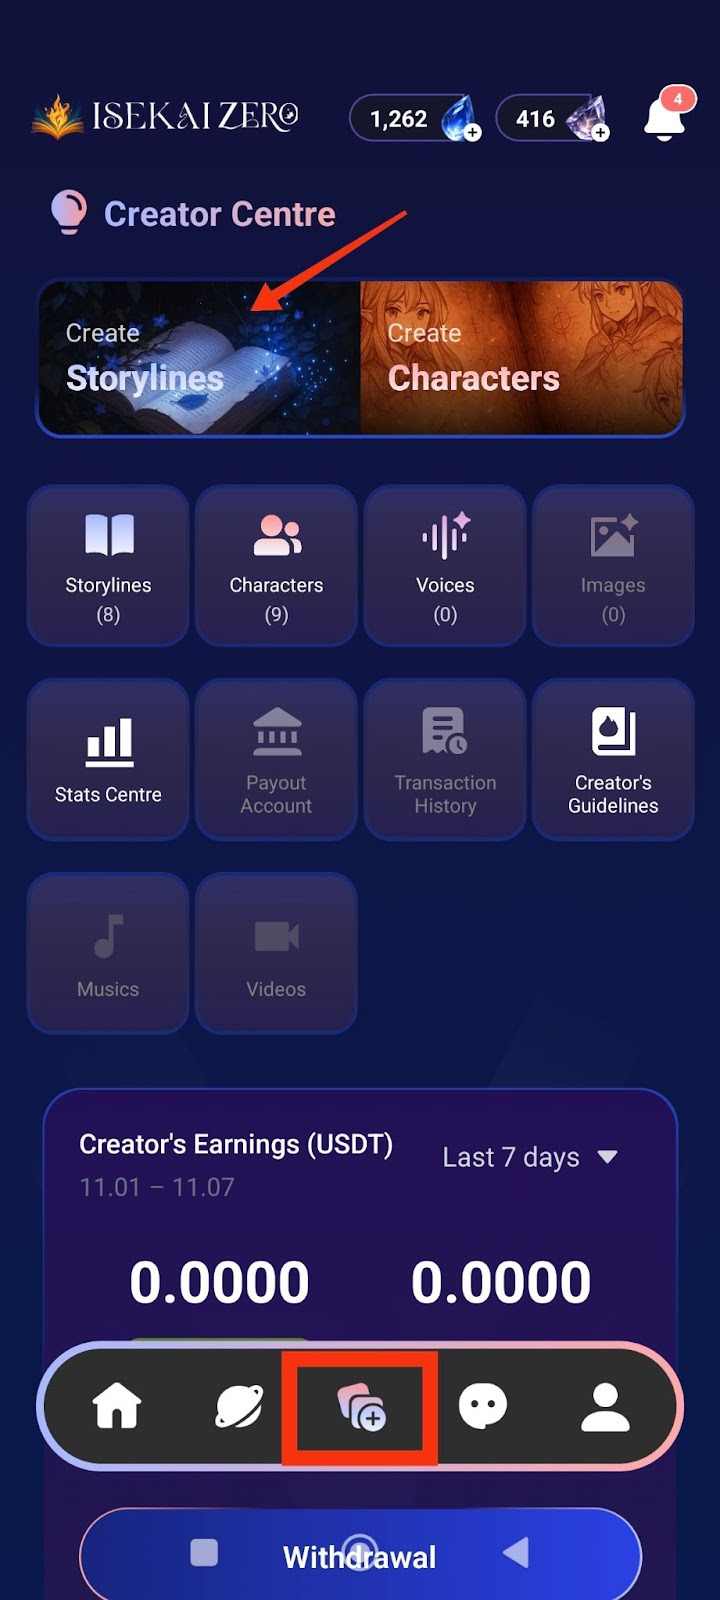
Step 1: Access the Creator Centre
- Open the Isekai Zero app.
- Tap on the Creator Centre section.
- You'll see two main options at the top.
- “Create Storylines” is on the left.
- Tap on "Create Storylines".
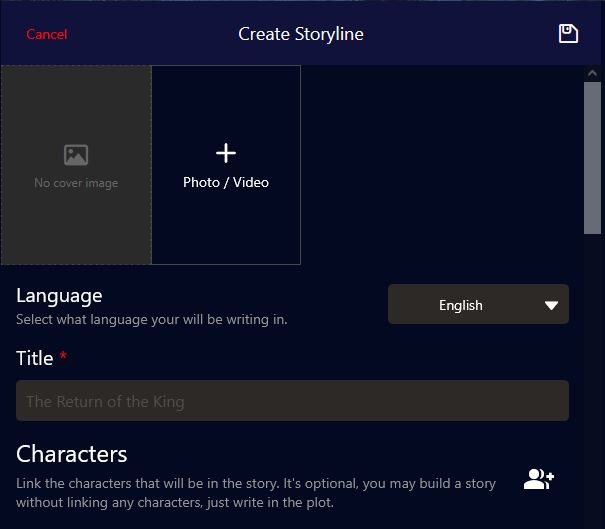
Step 2: Add a Cover Image
*Compulsory for Public Storyline
**Optional for Private Storyline
The Create Storyline screen will open. At the top, you'll see:
- A placeholder to add image
- To add a cover image:
- Tap the "+ Photo / Video" button
- Select an image from your gallery
- The first image will be the thumbnail for your storyline
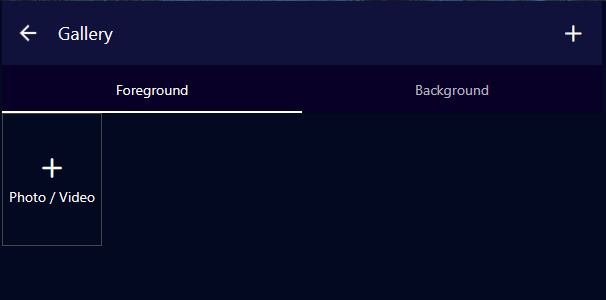
Adding Story Images (Foreground & Background)
These images create the visual experience as your story plays, especially in Visual Novel mode.
Understanding Image Types:
Foreground Image:
- The character or subject image that appears in front
- Usually a PNG image with transparent background
- Shows the character/subject of interest during the ongoing story
- Examples: Character portraits, NPCs, creatures, important objects
Tip: Use PNG files with transparent backgrounds for best results
Background Image:
- The location/environment image behind the character
- Shows where the scene is taking place
- Examples: rooms, dungeons, parks, hallways, forests, castles, city streets
- Sets the mood and atmosphere of the scene
Image Caption:
- Text descriptions that help the right image appear at the right moment
- Allows images to change dynamically based on what's happening in the story
- Example captions: "in the throne room", "during battle", "at sunrise", "talking to the merchant"
- The AI uses these captions to match images to story events
Character Image Captions:
Character image captions allow the right emotions to appear during the story. Use emotional descriptions to trigger appropriate character expressions.
Examples:
- "Jane is happy"
- "John is excited"
- "Lola is sad"
This helps the AI system display the matching character emotion/expression based on what's happening in the story narrative.
How to Add Images:
- Tap "Add Foreground Image" to upload character/subject images
- Tap "Add Background Image" to upload location/environment images
- For each image, optionally add an Image Caption to describe when it should appear
- You can add multiple images for different scenes
Image Tips:
For Foreground:
- Use PNG format with transparent backgrounds
- Focus on clear character expressions and poses
- Consider different poses for different emotions (happy, sad, angry, etc.)
For Background:
- Use high-quality landscape/environment images
- Match the atmosphere of your story (dark for horror, bright for adventure)
- Consider having backgrounds for different locations in your story
For Captions:
- Be specific but concise: "in the castle courtyard" not just "outside"
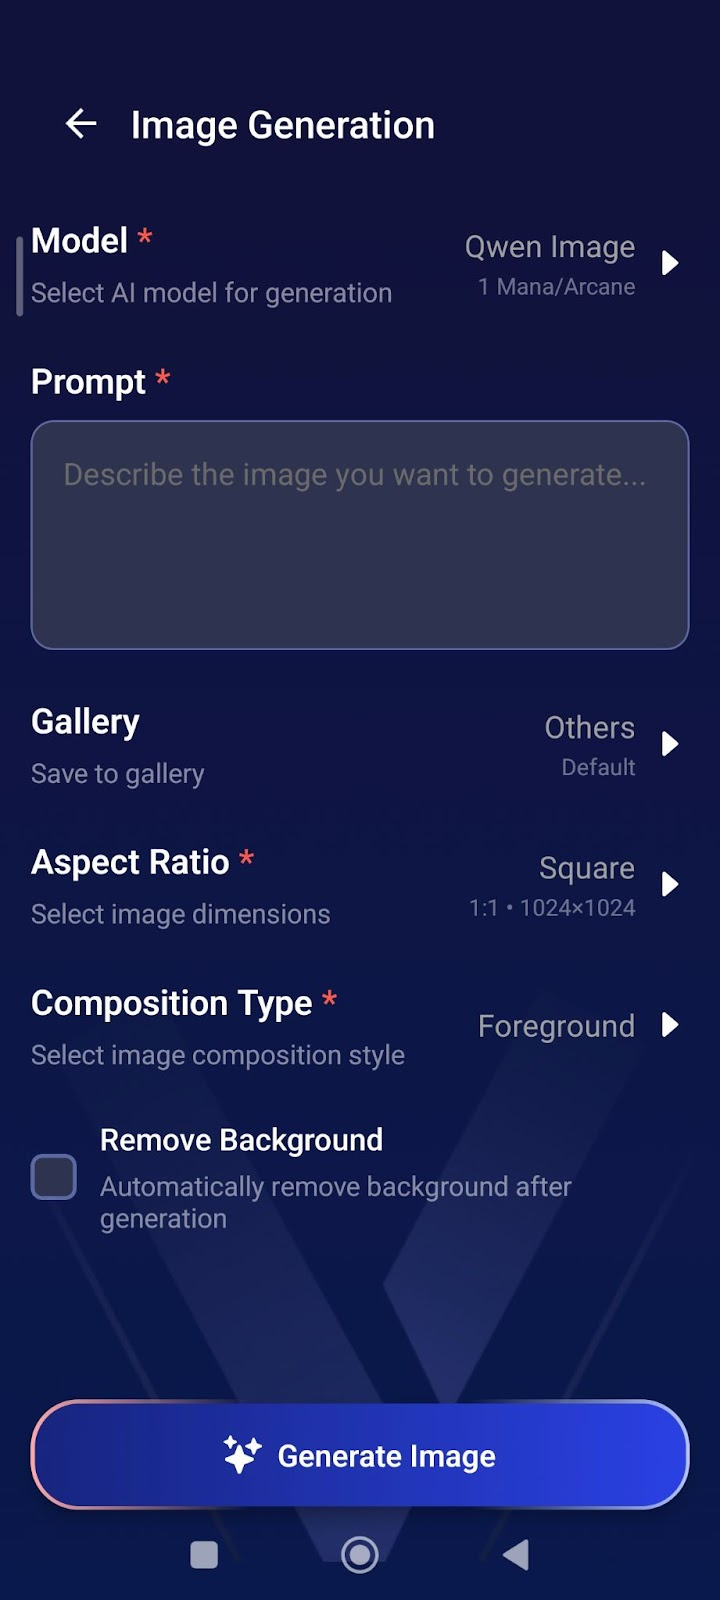
AI Image Generation
How to Generate Images:
- From Creator Centre, tap "Images"
- Tap "Model" → Select AI model (costs 1 Mana/Arcane)
- Write your "Prompt" → Describe the image you want
- Select "Aspect Ratio" → Choose Square (1:1) for portraits
- Choose "Composition Type" Foreground = Character images, Background = Location images
- Check "Remove Background" (optional) → Creates transparent PNG for characters
- Tap Generate Image
Prompt Tips:
For Characters:
- "Elf warrior, blonde hair, green eyes, leather armor, smiling, anime style"
- Enable "Remove Background" for clean character images.
- For Backgrounds:
- "Dark medieval castle interior, torch lighting, stone walls"
- Keep background unchecked.

Step 3: Select Language
- Find the "Language" dropdown
- Tap to select the language you'll be writing in
Step 4: Enter Your Story Title ⚠️(Required)
- Find the "Title" field (marked with a red asterisk *)
- Type your storyline title.
Step 5: Link Characters (Optional)
- Scroll down to the "Characters" section
- You'll see a icon on the right
- Tap it to link character(s)
- Note: This is optional - you can create a story without linking characters
Step 6: Write Your Plot Summary ⚠️ (Required)
- Read the instructions.
- Write a short, catchy summary (20 words or less)
- Example: "A dark lord rises, and unlikely heroes embark on a quest to destroy a powerful artifact."
Step 7: Write the Full Plot (AI Instructions) ⚠️ (Required)
- Read the instructions.
- Write your complete story plot with details
- Important tips:
- Write {{user}} wherever you want the player's name to appear
- Be detailed - the AI uses this to generate responses
- You can use Markdown formatting (bold, italics, etc.)
- You can use HTML if needed
Example:
As darkness threatens the land, {{user}} and their loyal companion, Elen, set out on a perilous quest to destroy a powerful artifact...
Step 8: Write Plot (User Version) ⚠️ (Required)
- Scroll down to "Plot (User)"
- This is what users will actually read
- Write the same or a modified version of your plot
- Tip: This can be more narrative and engaging since players will see it
Step 9: Configure Advanced Mode (Optional)
- Find the "Advanced Mode" toggle switch
- When ON (green): The plot displayed to users can be different from what the AI reads
- When OFF (gray): The same plot is used for both AI and users
- Leave it ON if you want different versions
Step 10: Configure Secret Mode (Optional)
- Find the "Secret Mode" toggle switch
- When ON: Hides the AI prompt from users
- When OFF: Users can see the prompts
- Choose based on your preference
Step 11: Write Prompt Plot (AI) ⚠️ (Required if using Advanced Mode)
- Find "Prompt Plot (AI)"
- This is specifically what the AI will read to generate responses
- Write detailed instructions for how the AI should handle the story
- Use {{user}} for the player's name
Step 12: Add Prompt Guidelines (Optional)
- Add instructions for the AI's behavior
- Example: "Focus on the relation dynamics" or "Avoid using repeated vocabulary"
Step 13: Add AI Reminder (Optional)
- Find the "AI Reminder" section
- This reminder will be placed after every user message to help the AI remember important details during the story
- Use this for critical instructions you want the AI to consistently follow throughout the chat
- Example reminders:
- "Follow the prompt guideline strictly"
- "Trigger stat system every new day and when user says 'check status'"
- "Keep storyline direction focused on the main quest"
- "Remember character relationships and past events"
*Important Note: Too much reminder text may make AI responses rigid
Works best for very specific, essential instructions rather than general guidance
Step 14: Create First Messages (Scenarios) ⚠️ (Required)
-
Write the opening message for your story
-
Tap the "+" button to add more starting scenarios if you want to
-
This is how the story begins for players
-
Make it engaging and set the scene
-
Use {{user}} for player names
Example:
"You're finally awake," Elen says, her voice a mix of relief and gentle teasing. She sits beside the fading campfire...
Step 15: Add Storyline Tags (Optional)
-
Tap the pencil icon on the right
-
Add relevant tags to help users find your story
-
Examples: fantasy, adventure, romance, action
Step 16: Set Player Personas (Optional)
-
Tap the icon on the right
-
Link characters that players can choose to play as
-
Note:
-
Use this feature if you have a recommended character for your story - especially helpful for character-focused storylines where you want users to experience the story through a specific character's perspective
-
Setting player personas guides users toward the intended gameplay experience
-
This is optional - users can choose other characters if you don't set this
Step 17: Choose Visibility Settings
-
Scroll down to "Visibility" section
-
Tap the dropdown (shows "Private" by default)
-
Select from three options:
-
Private: Only you can see it
-
Unlisted: Anyone with the link can access it
-
Public: Everyone can find and play it
Step 18: Save Your Storyline
-
Scroll to the bottom of the page to tap the large "Save Storyline" button OR
tap the on the top right of the page.
-
Your storyline is now saved!
Tips
- Use {{user}} placeholder - This automatically inserts the player's name
- Be detailed in AI Plot - The more detail, the better AI responses
- Make engaging first messages - Hook players from the start
- Test your story - Create it as Private first to test before making it Public
- Add multiple scenarios - Give players different starting points